
FERRARI F1 SF90 - MONZA 2019 - NOSE AND WING
Product Description
Ferrari SF90 2019 Monza – 3D Model Project Description This 3D model of the Ferrari SF90 2019 Monza was started in June 2024, and the creation process took about 4-5 months including prototyping, printing, and post-production. The model is definitive
Additional Notes
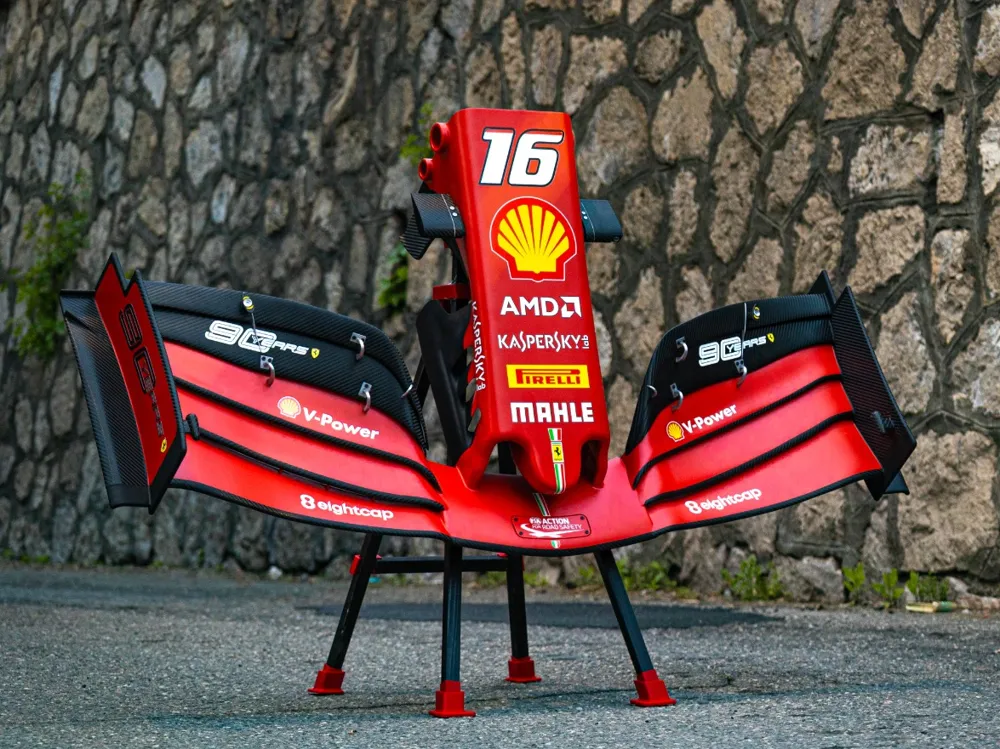
Ferrari SF90 2019 Monza – 3D Model Project Description This 3D model of the Ferrari SF90 2019 Monza was started in June 2024, and the creation process took about 4-5 months including prototyping, printing, and post-production. The model is definitively finished and ready to be presented, with all final details and finishes completed. The central nose and front wing are among the most complex sections of the project, characterized by high-precision assembly details. 3D Model Details Materials used: The model was printed using PETG and ABS, with a print precision of 0.12 mm and a 0.4 mm nozzle. Project status: The model is fully finished, with all components assembled and refined. Model Dimensions Width: 1,20 m Length: 60 cm Height: > 30 cm Weight: < 6 kg Central Nose Assembly The assembly process begins with the central part, which consists of 2 large pieces. These pieces are joined together using a drilled joint that allows for the insertion of a two-component adhesive for sealing. Subsequently, the entire assembly is secured with 5 bolts and corresponding M6x3 nuts to ensure stability. Central Wing Assembly After assembling the central part, proceed with the 2 central wings, which are connected with an interposed support between the two. The wing breakdown assumes that they are already mirrored on the print bed, with distinct markings for left and right. The 10 small wings have precise interlocking joints, but even if the print tolerance is perfect, they might require light filing on the male joint and a bit of glue to ensure a solid hold. For this, I recommend using Nayrmaer, available on Amazon, which offers small nozzles to avoid unnecessary drips and leaves no white marks on the 3D printed parts. Deflectors and Final Assembly At the ends of the 10 small wings are 2 deflectors, which must be assembled together and then joined to the small wings. Printing at 0.12 mm allows for simplified sanding, making it easier to prepare the pieces before gluing for a perfect result. After assembling the components, it is recommended to use 400-grit bodywork sandpaper to remove impurities and any glue that might seep from the joint seams. Final Treatment and Painting The next step involves blowing and wiping the pieces with a cloth to prepare them for the primer. For the primer, I recommend entrusting it to a good body shop or proceeding in a DIY manner with an airbrush. After applying the primer, it should be sanded with 400 and 500 grit sandpaper for a smooth surface. Two coats of primer are recommended for a solid base. Regarding painting, I used PPG Rosso Scuderia 2023 (matte), which gives the model an authentic appearance. I can also provide the paint code for those who wish to reproduce it perfectly. Final Details and Decals Finally, for the details, colors such as silver gray and yellow are used, printed with a 0.2 mm nozzle. The decal profile will also be available soon to complete the model. Conclusion Thank you for following this project. I invite you to enjoy the printing and assembly process, and to contact me for any questions or for further details on the components. Happy printing and have fun! Contacts and Social Media For those interested in following our work, you can find us on Instagram with the profile https://www.instagram.com/xrev_design/ . Alternatively, do not hesitate to contact us via email for any information or request: [email protected].
| Category: | Electronics |
| Manufacturing Method: | FDM |
| Material: | PLA/PETG |